Showing posts with label Make up. Show all posts

Thursday, 27 August 2015

Makeup Revolution Haul || Correct, Contour, Blush, Highlight...


After many months of being a good girl, I decided I would take advantage of the offer Makeup Revolution had on their website... 3for2 on everything!! I am very sorry to say that this deal is now over. *sad face*

On a quick side note I got a new phone recently, the Samsung Galaxy S6. It has an amazing camera so all the photos you see on this blog post are taken using it. I wanted test it and I am very impressed.

I read about the new corrector palette and their contour palette on so many other blogs, so naturally I added these straight to my basket. In this post you will find photos and swatches of the products I bought.

Let's start with the base, the colour correction palette. 
It has 8 different shades, each with it's own job. 

Pink - Brightens
Lavender - Neutralises yellow tones
Green - Neutralises redness
Peach - Balances out slight discolouration 
White - Adds natural highlight
Cream - Neutralises purple/dark areas
Brown -  Balances a shines in darker skin tones

The colours are super creamy, very opaque and pigmented.
I have no pictures when them in use on my face yet, but I think I'll do a whole 'makeup routine' blog post using these products in the next month.


Onto the contour palette... Being quite pale most of the time I do need some help with making my face look a little more alive and healthy. Again these are super pigmented, especially the darker colours and the shimmery highlights. I love using the colour second in from the left at the bottom for contouring, a great more neutral brown, perfect for paler skin tones.


I LOVE THIS BLUSH PALETTE!

Look at the amazing colours. If you are on the paler side, be super careful when using the deeper colours as they damn pigmented and you can end up with very colourful cheeks... Believe me, I went there a few days ago!


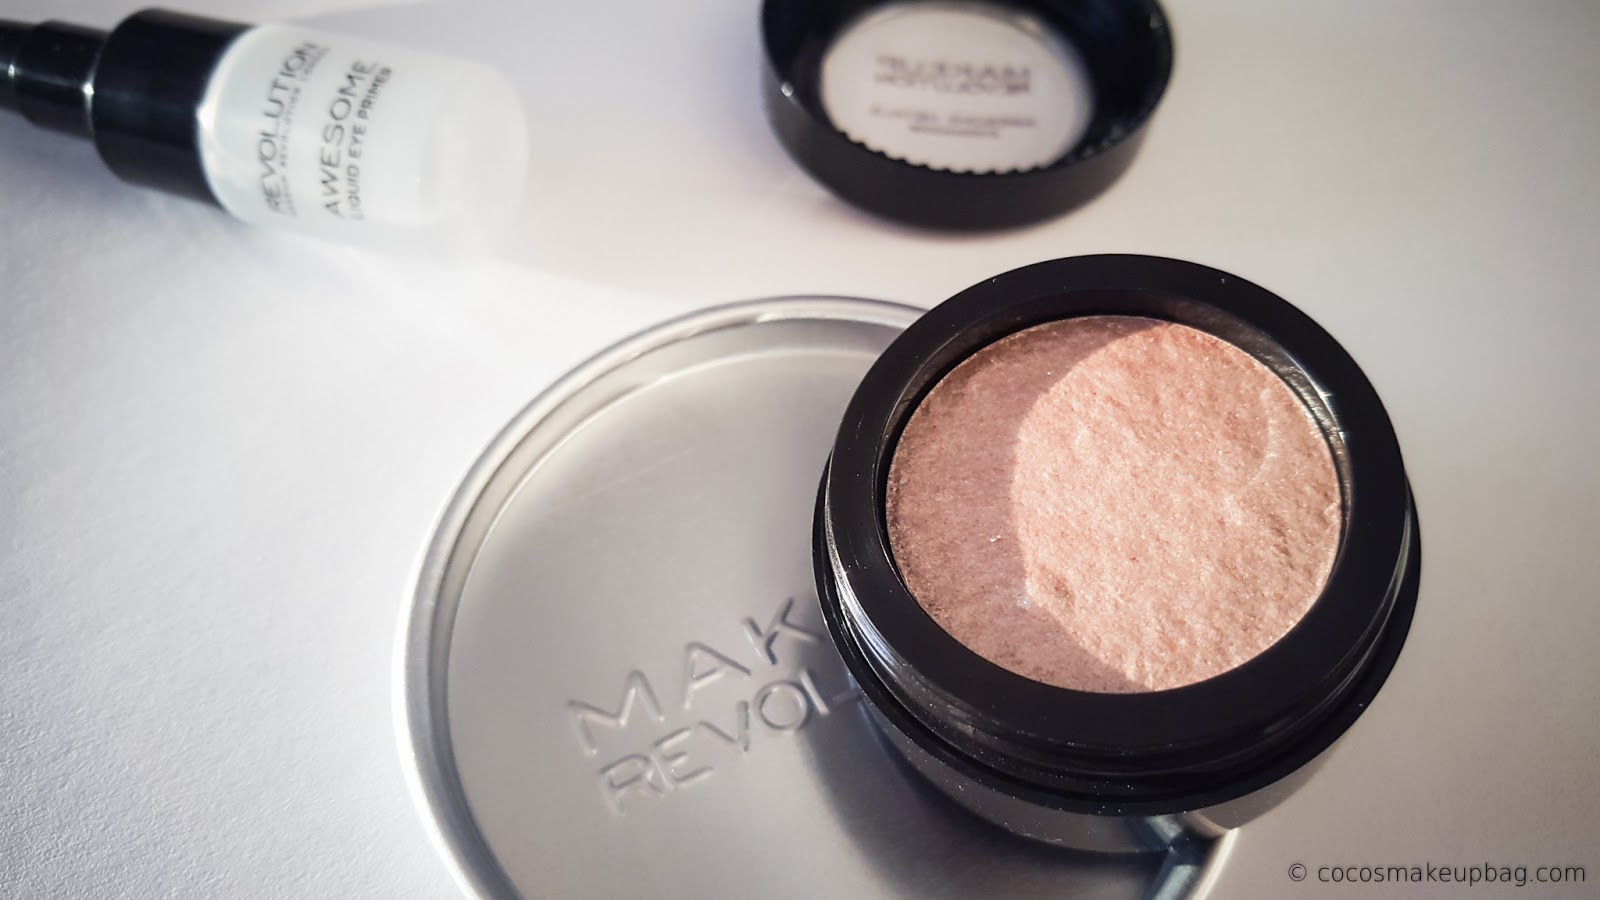
The next product that made it into my basket is this triple baked highlighter.
Ok, yes I did buy this because of the packaging...so cute.
I have a few highlighters from Makeup Revolution and this is the most difficult to go overboard with.
I have found it is easier to use my finger to apply this one whereas with the other ones I have I use a brush.


I have had my eye on this Rose Gold Foil for so long, it was always out of stock when I went to buy it in the past, but I finally have it.

It is glorious!

I saw Nikkie from NikkieTutorials use it as an inner corner highlight in one of her videos, so that is how I have used it so far. I am excited to do a full eye look with it though.


The swatch on the left is it straight out of the pot using a small brush, the one on the right is it mixed with the Liquid Eye Primer that comes with it.


And finally I bought their Oil Control Fixing Spray to set everything once I have piled all of the above make up on my face.


Ultra Base Corrector Palette £6.00
Ultra Contour Palette £8.00
Ultra Blush and Contour Palette - Sugar and Spice £6.00
I ♡ Makeup Blushing Hearts - Goddess of Love Highlighter £4.99
Awesome Metals Eye Foils - Rose Gold £4.00
Pro Fix Oil Control Fixing Spray £5.00

I hope you enjoyed my post and then go on to buy all of these amazing products.
Happy shopping!

Coco
X

Saturday, 11 April 2015

Makeup Revolution || Wish List...


My list of things I want from Makeup Revolution is ever growing so I thought I would make a Wish List from their website! I have linked all the products where you can also see what they look like.

Hope you enjoy this post and maybe find something to add to your own wish list...

Their recently released Ultra Brow (Palette) in Medium to Dark, which comes with 4 brow powders, 2 tinted brow waxes, arch enhancing cream, brow bone highlighter, brow pencil, 2 brushes and some mini tweezers... all for £7.99.

I have their Flawless Matte Palette and would like to add the Beyond Flawless & Flawless palettes to my collection. £8.00 each.

I love a good blush and this Ultra Blush and Contour Palette in Sugar and Spice looks so beautiful. It has a mix of shimmer, matte and baked colours. £6.00.

I haven't tried any setting sprays yet because most are out of my price range, also having an oily t-zone I thought this would be perfect for me - Pro Fix Oil Control Makeup Fixing Spray. £5.00.

I have 3 of their eye shadow brushes and would like to expand my selection with the Pro F103 Stippling Brush and the Pro F105 Contour Brush. £3.49 each.

To clean the above brushes I would like the Pro Hygiene Antibacterial Brush Cleaner. £5.00.

This is my list so far but I'm sure I will find more to add very soon!

What are your favourite Makeup Revolution products?

Coco
X

Saturday, 14 February 2015

My Eyebrow Routine || Ultra Aqua Brow Tint...

From having an issue with the delivery of my Anastasia Dipbrow I decided to look for another option. I looked at lots of other blogs and having used lots of Makeup Revolution products (my collection is gathering rapidly) and finally decided to buy the Ultra Aqua Brow Tint which comes in four shades and £3 each.

It says on the website that it is a 'smudge-proof eyebrow tint, that fills, defines and lengthens your brow'. I think it lives up to what it claims but does smudge a little if you touch it too much.
Saying that I haven't had a problem in wearing it all day and still having perfect eyebrows before I take my make up off when getting ready for bed.


I bought two colours to mix together to create my perfect shade of brown to match whatever hair colour I have. Currently I have dark brown ombré with lighter tips but my brow hairs are much more fair, even though I get them tinted through having HD brows. This picture is from my most recent session, picture from my amazing HD brow lady, Aline Kaloudi.


To get my shade of brown I use 1 part of the dark mixed with 2 parts of the light shade which you can see below. I then use my Zoeva 317 Wing liner brush to mix and apply the colour.


Below you can see step by step pictures of the stages I go through to create my brows.

Firstly I create a line from near the front of my brow to my arch. 
Then I draw on the shape of the outer part of my brow, the pointed tip. 
Using a bit more product I fill in the rest of my brow forming another line but this time on the upper part of the brow and not going all the way to the front. 
Finally using what is left on the brush I gently fill in the front part of my brow so it has a natural fade. 
Lastly then using a spoolie (disposable mascara wand) I carefully brush my brows though making sure the colour is even and the hairs are going in the right direction. 
And that is me set for the day!


I have really enjoyed using this new eyebrow product and feel I can really create great looking brows which last very well during the whole day. I have a scar in my right brow which is very visible if not filled in and this product covers it well as you can see from this final picture.

If you don't have much time to get ready in the morning another product by Makeup Revolution I have used and found to be great is the Brow Arch & Shape which costs £3.50 and comes in four different shades like the Aqua Brow.

Hope you enjoyed this blog post and found it useful, if you have any questions post them below!
Thank you for stopping by.

Coco
X

Wednesday, 11 February 2015

Younique || Valentine's Day Make Up Look & Product Review (*)...


A lovely lady called Kirsty contacted me asking if I wanted some samples(*) to review on my blog, I very happily said yes! I also ended up purchasing the lash product you will see in this blog post! 

This post is about Younique which is a beauty company and I will be talking about the Moodstruck Pigment Powders (*), Moodstruck 3d Fibre Lashes, Moodstruck Glorious Face & Eye Primer (*) and the Uplift Eye Serum (*).

Above you can see the finished look and below you will find step by step pictures on how I got to it.


Here are the 4 samples of the Moodstruck Pigment Powders I received (first to last) Sassy, Flirty, Regal & Feisty. These are what I used to create this purple smokey eye look which I thought would be great for a Valentine's Day make up look. 
I found these powders very easy to blend out and I love that they aren't super sparkley; they have more of a shimmery pearl effect.


I applied Flirty (pale lavender purple) all over the lid. 

Then used Regal (deep purple) in the crease and under the lower lash line. 

To finish off I used Feisty (gun metal grey) to add a bit more depth to the crease and smoke out the lower lash line and a bit of Sassy (pastel pink) to add some warmth to the look. 

I did a basic winged liner with this look and used the Moodstruck 3D fibre lashes for natural looking fluttery lashes.

You could pair this eye make up look with either a nude, pink or even deep purple lip!


Onto the Moodstruck 3D Fibre Lashes. Amazing.. Just amazing!!
I have never used fibre lashes and was super excited to get this product.
Firstly it comes in gorgeous packaging, almost looking like a very expensive sunglasses case, but inside you get two tubes; one containing the transplanting gel and the other the natural fibres.

In the above picture I applied one thin coat of my favourite mascara and on just the eye on the left I added one coat of the fibre lashes. It lengthens and thickens the lashes but still looks very natural. I found it very easy to use and had little to no fall out from the fibres. It comes with instructions but I also looked on YouTube and found lots of tutorials on how to apply it. 
Apply the gel first, then before that dries add the fibres and then finally seal them in with the gel.

Below you can see before anything was applied to my lashes and then after, where I had applied one thin coat of mascara and two coats of fibre lashes. 


On a quick final note I shall do a mini review of the samples I received.
(pictures used from the website)
I found them both very lovely to apply. The Glorious Face & Eye Primer really made my foundation go on smoothly and made it feel like my make up would stay put throughout the day. And the Uplift Eye Serum felt hydrating and absorbed well into the under eye area. Neither of them felt greasy which is something I love in anything I put on my face. And when I have the money I would definitely consider buying either or both of these products.


I do hope you enjoyed this post and the make up look I created. All the links to the products and Kirsty's page are at the top of this post. There you can also find more pictures of the products mentioned in this rather lengthy blog post.

Thank you for taking the time in reading this!

Love Coco 
X

Related Posts Plugin for WordPress, Blogger...