Showing posts with label Makeup. Show all posts

Wednesday, 6 December 2017

Cruelty Free Eye Makeup Look || Red

I do love red eye shadow!

You do have to be careful with red, or you'll end up looking ill or injured. I like to smoke mine out with various transition shades and a bright inner corner.

Here's how I created the look shown below...

The first colour I used in my crease was Coloured Raine Gingerbread which is the shade you expect it to be with a name like that. To deepen I added Inglot shadow 329 and to blend all that out I added Nabla shadow Wild Side.

For ages I was on the hunt for a good red shadow and then I found the perfect one by Stargazer - Deep Red eye shadow. I put this shade all over my lid and then on the outer corner I darkened it with Makeup Geek shadow Cherry Cola.

For my inner corner I first used Nyx shadow in Whipped Cream and then for extra brightness i blended Nyx Jumbo Eye Pencil in Cottage Cheese. The red eye shadow made it slightly pink but I didn't mind, I think it looks good like that anyway.

Lastly on my lower lash line I used the Inglot 329 shadow and blended out with Nabla Wild Side.

The mascara I use is Catrice Glam & Doll waterproof mascara and brows are Anastasia Beverly Hills Dipbrow in Ash Brown.

I hope you enjoyed this look and this post,
Love Coco x

Wednesday, 29 November 2017

Cruelty Free Eye Makeup Look || Blue

I had a look through my most recent eye makeup looks on Instagram and realised I haven't used blue in a while, so that was today's aim.

I used Pinterest for my inspiration and found a makeup look by Little Dust MUA who I already follow on Instagram, she's amazing so click the link and go follow her. I had her eye look up in front of my whilst creating this look. (See below to find my makeup look)

Using my trusty Catrice Liquid Camouflage Concealer (they only do 3 pale shades which is ridiculous) as my base and setting it with RCMA No Color Powder.

I started with my Inglot shadow in 314 in the crease as my transition colour. Then I used Inglot shadow in 321 to start darkening my outer corner. I always got my Inglot shadows from Beautylish when I ordered certain Jeffree Star lipsticks. But you can get Inglot on a UK site too.

I put Neptune by Makeup Geek on the centre of my lid and a Whipped Cream shadow by NYX to brighten my inner corner. (Such a great pigmented white shadow).

To deepen and blend out my crease I used a mixer of these shadows going lightest to darkest - Nabla Paprika and Fahrenheit, with Makeup Geek Cocoa Bear and Corrupt. Corrupt I used mainly on the outer corner and along my lash line.

I went back and forth with all the above shadows making sure everything was blended, my outer corner was dark and the blue was bright. I also added the blue (Neptune) on my lower lash line.

The mascara I use is Catrice Glam & Doll waterproof mascara and brows are Anastasia Beverly Hills Dipbrow in Ash Brown.

I really love this look and I hope you do too,
Love Coco x

Wednesday, 22 November 2017

Cruelty Free Eye Makeup Look || Gold and Purple

For today's eye look I wanted to use some shadows I haven't used in a while.. I created a caramel/gold look with a pop of purple. 《Picture below..》All the brands I use and link are cruelty free.

As my base I used my Nyx HD Concealer using my Beauty Blender to blend it out and then set it all using my RCMA No Color Powder.

In the crease I used my Nabla eyeshadow in Caramel, I love this unique colour and Nabla eyeshadows blend super easily. For the subtle gold on the lid I used Makeup Geek shadow in Glamorous.

And now the pop of purple, I used Linda Hallberg Mood Crayon in Daring on the waterline and blended around my outer lash line.

My go to mascara is Catrice Glam & Doll waterproof mascara.

And lastly my brows, I've been trying a different technique lately.. drawing on brow strokes instead of the soft blend I usually do. I always use my Zoeva Wing Liner brush with my Anastasia Beverly Hills Dipbrow in Ash Brown. (Some products I haven't been able to link right now because the Beauty Bay website is down, I will link them as soon as I can) ♡

I had my brows microbladed a year ago and I've loved having a shape alrwady there so doing my brows is super fast, I'm going to let these fade a little more and then next time I get them microbladed, I'm going to try a different shape.

Check my Instagram for more looks.

I hope you enjoyed this post,
Love Coco x

Saturday, 18 November 2017

Cruelty Free Eye Makeup Look || Green Orange Yellow

Hey everyone,

I wanted to start blogging again, but in a way I will hopefully enjoy it more. My posts will be short and sweet...ish.

Today's post will be about the products I used to create the makeup look you see below. I post almost daily on my Instagram with my eye makeup looks.


First I used the Nyx HD Concealer with a Beauty Blender to conceal my under eyes and prime my eye lids. I then set it with my RCMA No Color Powder.

All the eye shadows I used are by Makeup Geek Cosmetics - Chickadee in the crease, Lemon Drop on the inner corner, Morocco on the lower lash line, Dirty Martini all over the lid and Enchanted Forest on the outer corner. I get all my Makeup Geek Shadows and a lot of my other makeup from Beauty Bay.

The beautiful Linda Hallberg created her own makeup line. If you haven't watched any of her YouTube videos, you're missing out. I bought her Mood Crayon set which are multi use pencils for eyes, lips, whatever you want really. They're super creamy and set with a smudgeproof finish. I use them in my waterline, usually two layers to get a vibrant finish. The colour of crayon I used for this look is called Likable.

My favourite brow product to use is my Anastasia Beverly Hills Dipbrow in the colour ash brown. And I always use my Zoeva Wing Liner brush to apply it.

When I go to Austria to visit my family, I always love going makeup shopping. I found the brand Catrice does amazing, super affordable mascara. My favourite is the Glam & Doll waterproof mascara; the bristles are rubbery, really grip the lashes and keeps them curled all day long.

Since a friend recommended it to me, I bought the Nyx Epic Ink Liner, I find it really easy to do winged liner with. It has a brush tip, is super black and stays on all day. I don't suffer with oily eye lids so don't have a problem with eye liner smudging or transferring. I get all my Nyx products from my local Boots.

I hope you enjoyed this post,
Love Coco x

Tuesday, 16 February 2016

I've Started a YouTube Channel...

I thought I'd do a little blog post about the fact I've started a YouTube channel where I will be posting make up looks. A major passion of mine is make up and thoroughly enjoy getting creative with my looks every day I do my make up. I always love helping people with finding products to suit their needs and teaching people make up techniques.

Here's a link to my YouTube channel-

And here are my first two videos which got uploaded recently...


If you like my videos so far I would love to get some more subscribers as I will be uploading (hopefully) on a regular basis. 

Come follow me on Instagram, I regularly post my make up looks on there.

Coco
X

Monday, 1 February 2016

DIY || Unique Palettes feat. Makeup Geek...

For a while now I've been wanting to have a customisable make up palette and I finally had an idea on how to make it fun & unique to me (and you if you feel inspired by this post).

Growing up with my Dad obsessed with auctions and vintage items, I think some of that rubbed off on me as I too have a love for quirky older items. 

I had been racking my brain on what was out there that I could use as my own version of the well known z-palette and finally thought of old cigarette cases. On good old eBay I found these cases you see below, I thought it would be good to have 2 sizes for travel purposes. Most of the DIY items I actually also bought off eBay. 

You will need -
Magnetic Sheet (sticky or non sticky)
Double Sided Sticky Tape (if you opted for the non sticky from above)
Scissors
Ruler/Measuring Tape
Your chosen case
And lastly some make up to put inside

I chose Makeup Geek as I have seen so many YouTubers loving it, I had a research and found out that the pans are magnetic. I bought my Makeup Geek eye shadows from Beauty Bay.


The rest isn't hard, you just measure & cut the size of the magnetic sheet you need to fit in your case and then stick it in. Some of the cigarette cases have a section inside that once held the cigarettes in but I just removed these so there was nothing getting in the way. 
(Step by step photos below)


I have rather a large list of Makeup Geek eye shadows that I would like to one day fill these up with but for now I chose (above left to right) - Peach Smoothie, Flame Thrower (Foiled) & Mocha.
Swatches below...


Here are the final pieces, showing how the 3 eye shadows fit in each case. I am super happy with how they turned out and can't wait to get more eye shadows to add to my new collection.


Make sure you follow my Instagram as I am always posting make up looks so there should be one soon using these stunning eye shadows.

If you get inspired to create something similar make sure to tag me in your photos on Instagram...

Coco
X

Friday, 22 January 2016

Beauty || Recent Favourites...


We're already 22 days into 2016, how did that happen?!

I have been thoroughly enjoying my make-up collection, mainly because I received a lot of lovely things for Christmas and I've treated myself to a few things recently as well.


I shall start off with a few new make-up brushes.
I have found a new obsession, the Zoeva Rose Golden make-up brush collection, which as of recently you can buy separately.


I have two go to brushes I use for my brows with brow pomade - 
The 310 Spot Liner Brush for doing delicate brush strokes to fill in the front of my brows and the 317 Wing Liner Brush to fill in the rest.

I also got my hands on the Real Techniques Bold Metals Essentials just after Christmas and have been loving the 200 Oval Shadow Brush for a quick all over the lid shading brush if I'm in a hurry.


At the end of last summer I bought my first higher end foundation and was completely blown away by Estee Lauder Double Wear foundation. It's the only foundation that doesn't slide off my oily face.
I've had to buy a white foundation to mix because I went more pale than I thought I would go this winter. So my Manic Panic Dreamtone Foundation in White (Virgin) has been an absolute saviour.
And locking all my make-up into place and getting rid of the powdery look I use the Makeup Revolution Oil Control Fixing Spray.


My absolute favourite mascara has been Maybelline Lash Sensational in Waterproof Black, it applies a decent amount of product and holds my curled lashes all day long with no smudging or flaking. 
In November last year I did my first Colourpop haul (see my last blog post for the full haul) so my Super Shock Shadows have been my new go to for fun eye make-up looks. My favourites (which are pictured above) are Central Perk, a deep matte maroon and Kindness from the Metamorphosis collection which is a sheer yet super pretty iridescent purple/blue, amazing for adding on top of darker eye shadow bases for a bit of glam.
Last week I bought my first Maybelline Color Tattoos, I thought they would be great bases for different eye make up looks. I got a range of neutral shades- Creme De Nude, Creamy Beige and Permanent Taupe. (Swatched above...)


These I very much blame Nikkie Tutorials for, my new favourite contour, blush and highlighter for adding some life to my fair winter skin. Swatches below...
NYX Blush in Taupe is a perfect cool toned brown and is subtle enough even for the fairest of skin tones. 
Milani Baked Blush in Luminoso is an amazingly versatile blush colour that goes with any make up look.
My new obsession is my Mary-Lou Manizer by theBalm, a gorgeous pale champagne gold. 


The two palettes pictured above are by Makeup Revolution, they were a present for Christmas from my boyfriend. 

The Hot Spice Blush Palette is  full of amazing warm orange/coral toned colours.
And the Radiance Palette is a beautiful highlighting palette, the colours are more subtle than your usual highlighters and this palette is said to be a close dupe for the Hourglass Ambient Lighting Palette. 


And finally these brow pomades by Anastasia Beverly Hills and Freedom Makeup have been my go to for filling in my brows but I shall be doing a more in depth post on these soon...

Thank you so much for reading and I hope you have a perfect 2016!!

Coco
X


Sunday, 16 August 2015

Bourjois || Poudre De Riz De Java - Undereye Setting Powder...


I have recently been on the look out for a new undereye setting powder which isn't heavy & doesn't make my concealer go creepy and cakey.
I asked around on Twitter and someone suggested this one so I went hunting in Boots and bought it.

This is the Bourjois Rice Powder (Poudre de Riz), a very finely milled powder which is super silky to touch. It has a pinky nude tone with a little hint of golden shimmer to it.
Perfect for brightening and setting under eye concealer. 

Firstly before I go into great detail I have to say what sold me on this was the packaging, look at how cute it is!!!

The scent of the powder is one that matches the packaging, not to put anyone off, but it smells like powdery old ladies (no offence), I like it but don't worry for those who find that a bit odd, the smell does fade as soon as it's applied.

Smells aside, let's move onto what I think...

Even though it has a pink undertone I do feel it would work well on most skin tones, but could start looking a little ashy on more tanned/darker skin types (I might be wrong though, go swatch it on your hand to be sure). It does say one transparent shade suits all so I guess you don't know until you've tried it.

I have olive skin (skin that my sister's call alien skin because I'm so green compared to them) but I go pretty damn pale without sunshine, this worked really well when I was pale but when I'm more tanned I do have to mix it a little with either my stay matte or essence all about matt! powder to dilute the pink tones.

I think this would be really lovely as an all over setting powder for those of you with super pale pink-toned skin who want a bit of luminance in your life. I will be trying this when I turn into Casper the Ghost in winter.

I use this powder as part of my everyday make up routine, either on it's own or mixed with my other powders, it really brightens my under eye area.

Below I have tried to capture the colour and shimmer as best as I could so I hope the pictures are helpful if you are looking to buy this powder. It is a pretty heavy swatch to show the colour & shimmer, it doesn't look like that when I set my concealer with it.


I bought mine in Boots when there was a deal for Bourjois (2 for £14), but it is usually priced at £9.99 in Boots which I do think is a little pricey for such a small container. Saying that I do think it will last me a long time as you don't need very much.

Thank you for reading and I hope this helped you!

Coco
X

Monday, 25 May 2015

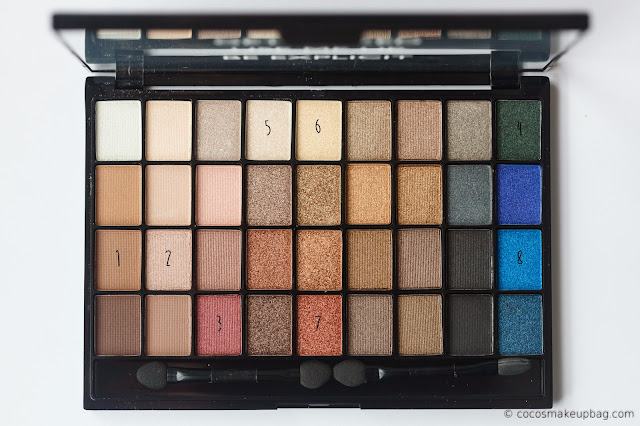
Makeup Revolution Slogan Palettes || Makeup Geek & Parental Advisory Explicit Content...


I wanted some new palettes from Makeup Revolution for a long time now and I finally decided on these two amazing slogan palettes from their sub-brand I Heart Makeup -


Makeup Geek £7.99

Below you will find photos of the palettes and swatches of different colours.

S P O I L E R  :  T H E Y  A R E  A B S O L U T E L Y  A M A Z I N G ! ! ! !


*DROOL* I love this picture... Look at how perfect the eye shadows are!


Another drool worthy picture, I call this one - 'The calm before the storm...'
Everything in it's rightful place before I played with the colours and swatched them all over my hands and face!!


Both palettes come with a mix of 36 shimmery and matte shades, all of which are stunningly pigmented. 
The shimmery shades are especially creamy to apply and have no fall out.

The Parental Advisory palette has the more neutral shades so I would say it will be great as a starter palette and then Makeup Geek is for the more brave of us out there. 
I got both because why not and I thought that they would be great used together for doing a neutral eye with a pop of colour. Perfect for creating fun summery looks!

I can't wait to use more of the colours from them. I have to restrain myself each morning when getting ready for work, there are only a certain amount of colours I can pull off at once. 

These palettes are so worth the money even if you buy them just to look at!

If you want to see a look using one or both of these palettes please leave a comment below.

Coco
X

Sunday, 26 April 2015

Benefit || Hoola Bronzer...


I had never tried this bronzer before but had heard lots of great things about it. I saw Benefit was doing a give-away on Twitter so I thought I may as well join in and see if I win .. and I did (!!) so I thought I would do a quick blog post about it.

Benefit were very lovely and the delivery of it was very fast, I was super excited to receive it.

Here's a link to their twitter as they are always doing give-aways!
#howdoyouhoola


I love the cute box packaging and it comes with the most adorable brush which you can see in the top photo, the perfect sculpting brush.


The colour is a neutral brown shade and is the perfect contour colour for people with pale skin, who need a little help with warming up their skin tone. I will definitely use it more during the winter months as I go quite far into the pale end of the skin spectrum. 
However I won't need it as much in the summer as I can usually get a pretty good tan. 

I really like that you can make this as subtle as you like for an all over warmth or build it up for a deeper contour. Here is a swatch of it on my hand.


Even though it can be quite subtle it is pretty pigmented and you don't need much for each application. So I think if you do buy it, it will last you a very long time.

You can buy it for £23.50 from Boots.

Hope you enjoyed my brief review of this cute bronzer!

Coco
X

Wednesday, 4 March 2015

Makeup Revolution || Flawless Matte Eyeshadow Palette...


I recently bought this eye shadow palette as I really wanted a full matte palette.
I got this from Makeup Revolution and is called Flawless Mattewhere you get 32 matte shades ranging from creamy whites, browns to black. The perfect palette to to create natural or more smokey looks. It also comes with a massive mirror.


I swatched a few of my favourite colours -

1. Nut - a yellow toned hazelnut brown.
2. Muse - a skin toned dusky pink.
3. Rosewood - a deeper more brown toned dusky pink.
4. Warm - a red toned dusky pink.
5. Rust - a rusty pastel orange.
6. Olden - a warm brown.
7. Earth - a deeper nut brown.
8. Carbon - a carbon black like the name suggests.

I love this palette and I feel it is my new favourite as it's the one I keep going to every morning. My absolute favourite colour out of the above shades is Rust, having green eyes it makes them pop and is a great colour for making a warm smokey eye. 
All the colours in this palette are soft, silky, pigmented and super easily blended.


In the same order I bought a few of their new make up brushes. From left to right, E101 Pro Eyeshadow Brush, E102 Pro Eyeshadow Contour Brush and E103 Pro Eyeshadow Blending Brush.


I have really enjoyed using these brushes and they do exactly what they're made to do. I have used the eyeshadow brush, which is quite small and firm to build up colour and also works great along the lash line. The contour brush is the perfect shape for fitting in the crease of the eye. and the blending brush is great for finishing off any make up look by blending away and harsh lines.
All their brushes are made from fine synthetic bristles. They also have brushes for the face and brush cleaning products.

Check their 'NEW' section of their website as they are always adding to their growing collection of amazing products.

Coco
X
Related Posts Plugin for WordPress, Blogger...